UBNT airFiber point to point and point to the multipoint device is the great replacement of fiber cable to get more than 1Gbps internet speed up to 100+ KM. see the complete UBNT Airfiber AF5 Point to Point configuration guide for long-distance wireless connectivity to deliver more than 1Gbps speed.
UBNT Airfiber AF5 Point to Point configuration for Long Distance
The UBNT airFiber is a replacement for fiber cable using high-speed wireless connectivity for long-distance. If you are looking more than 1Gbps wireless speed without fiber cable laying than UBNT airFiber is the best option. This post will describe a simple and user guide for Airfiber AF5U point to point configuration for long-distance wireless connection. AirFiber device having multiple variants with different speed and price range. The Airfiber 5 GHz Full Duplex Point-to-Point Gigabit Radio best for high-speed internet as well as CCTV camera for 100+ KM as per UBNT official website. As per the UBNT official website, they have Airfiber Point to point to the solution from 13Km to 100 KM distance.
Laying physical cable cost and time always higher than wireless connectivity but due to the limitation of speed in wireless, cable required. AirFiber makes it possible to get up to 2Gbps speed in wireless without worry about maintenance due to long distance. The configuration is easy and simple as other UBNT wireless devices. Making the wrong configuration and parameter selection sometimes downgrade the performance of the device.
UBNT airFiber AF5 Point to Point Configuration steps for Long Distance installation
There are different parts of the required configuration for the airFiber AF5 device. To making step by step configuration part avoid missing any settings and wrong configuration which Couse the downgrade airFiber performance.
1: Physical connection of UBNT airFiber
2: UBNT airFiber Login First Time
3: airFiber AF5U Master Configuration
4: airFiber AF5X LAN IP configuration
5: UBNT airFiber Slave Configuration
6: airFiber Point to Point Link Status
1: UBNT AirFiber Connection Diagram
UBNT airFiber device comes with default settings so before use must be configured properly. Follow the connection diagram below to UBNT Airfiber AF5 Point to Point configuration for long-distance connectivity.

Airfiber having 2 Ethernet ports, one for management and one for data. Connect the data port to the PoE adapter and connect the adapter data port to a laptop or PC LAN port. After the physical connection, you can proceed for the configuration part.
2: UBNT airFiber AF5 Login First time
The default IP address of airFiber AF5U is 192.168.1.20 Default username and password is “ubnt”.
Configure our PC/Desktop IP address with 192.168.1.x series to make airFiber access for configuration.
See here how to change Laptop/Desktop LAN IP address
Open web browsers such as Mozilla Firefox, Google Chrome, and Internet Explorer and type airFiber default IP “192.168.1.20” press enter key.

During the first-time login required country selection and accept term and condition.
1: use “ubnt” in username and password for the first-time login.
Country– Choose your country to follow telecom regulatory rules.
Language: select your language.
2: Check the box to “I agree to these terms of use”.
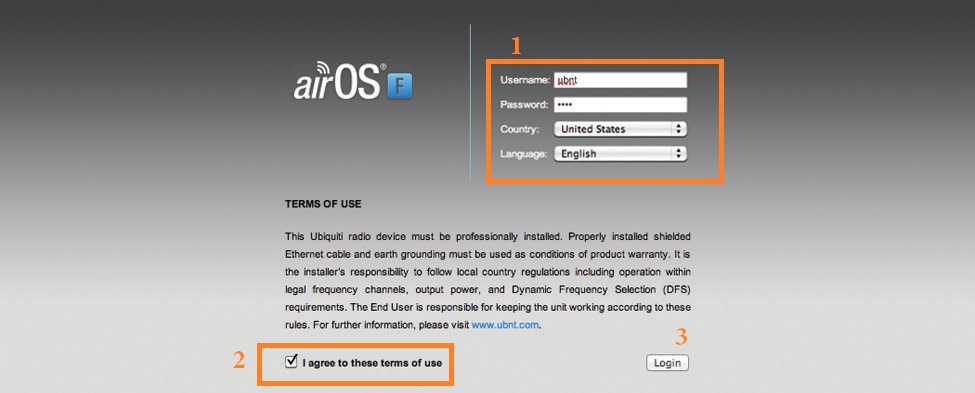
3: press the “Login” button to enter airFiber settings.
After the successful login of UBNT airFiber AF5 device now two-part of configuration to the required point to point wireless connectivity.
3: airFiber AF5U Master Configuration
To configuration of the point to point mode in airFiber device required master mode for local side and Slave mode for remote side device.
To configuration, Master mode go to the “wireless” tab from the top menu.
1: Click on “Wireless”.
2: Basic Wireless Settings
Wireless Mode: Master (choose the master if slave selected).
Link Name: type the Link name to identify while making scan this device. Use the site name or client name to easily identify where the device installed if access from your NOC.
Duplex: use the full-duplex to get full speed as per the supported airFiber model.
Channel Bandwidth: use the Channel bandwidth as per analyzing interference level in the area you going to use airFiber. If you use max channel bandwidth in the interference area it can be disturb speed and connectivity.
Output Power: adjust output power as per distance of PTP connectivity. Never use full output power in a short distance.
Maximum modulation rate: keep it with “automatic rate adaption”.

3: Frequency Setting:
Tx Frequency and RX Frequency: use the wireless analyzer to get non-interference frequency to get maximum output in point to point.
4: Wireless Security
Wireless security is the most important part to secure your airFiber point to point connectivity from unauthorized access.
Key Type: choose the latest Key type.
Key: type password for airFiber wireless connectivity.
Press the Change button after all settings and press the Apply button from notifications.
4: airFiber AF5X LAN IP configuration
While configuration any point to point device LAN IP address must be changed for both side devices. Every device comes with factory settings configured with default IP Address which can easily get from user manual and internet.
So before deploying your airFiber device in the site make sure you have to change the default IP address.
Change the Master and Slave device with different IP Addresses.
EXP: if Master IP is 192.168.1.20 use the Slave 192.168.1.21 or any other.
1: Go to the Network tab.
2: Management IP Address: use the Static option if no controller and manager are using of UBNT.
3: type the new IP Address in the box and press the change button.
After changing the IP Address reopen device with the new IP Address.
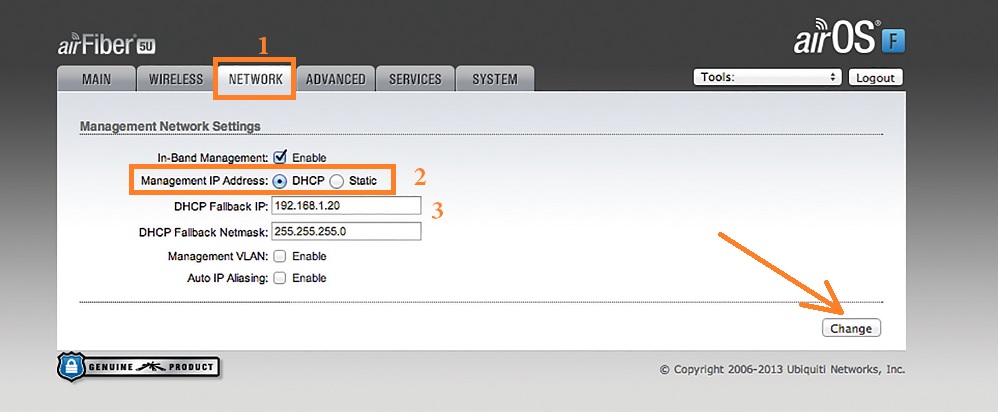
Make the Master and Slave both sides different IP Addresses to avoid IP conflict issue after connectivity of point to point.
5: UBNT airFiber Slave Configuration
I hope you have changed the default IP Address of the second airFiber device you are going to configure as the Slave device. If you still not change IP follow the above steps to change the Slave device IP address first.
1: Go to the Wireless tab.
2: Basic Wireless Settings
Wireless Mode: Slave (choose the Slave for the client-side device)
LINK name: type the same name using in Master device. (miss-spelling and using different name will not connect Maser device).
Duplex: use the full-duplex as configured in the master device.
Channel Bandwidth: use the same bandwidth selected in Master.
Output Power: adjust as per link distance.
Maximum modulation rate: keep Automatic Rate Adaptation.
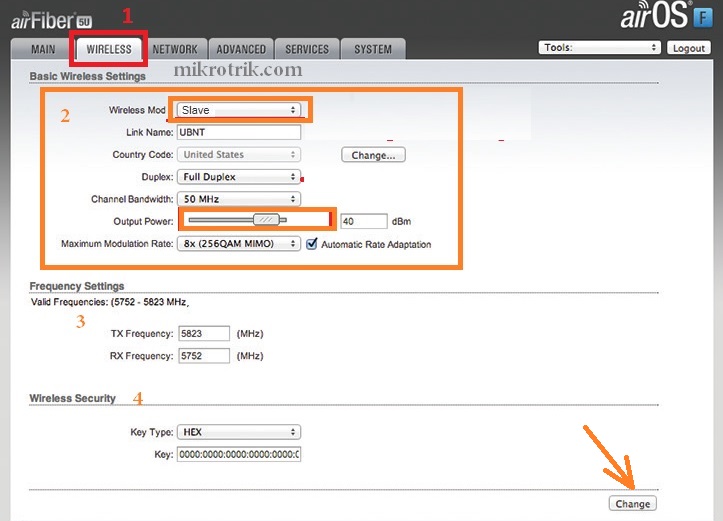
3: Frequency Setting
Use the same TX and RX frequency using in Master device.
4: Wireless Security
Key Type: select the same security type selected on the Master’s side.
Key: type password configured in Master Device.
Press the Change button to save the settings.
6: airFiber AF5 Point to Point Link Status
Once both side configuration properly configured after a few minute airFiber link will connect and you can ping master side IP Address to confirm connectivity.
To check link status, CCQ value and Tx, Rx data rate go to the status page.
Go to the Main tab to check link status.
Here you can see the signal strength of both chains using in AirFiber point to point device.
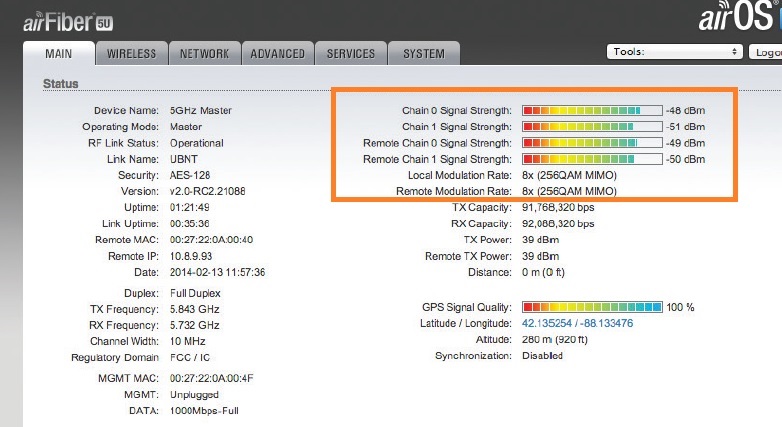
During mounting in the real site you can alignment until not get proper signal strength as showing in the picture. While UBNT Airfiber AF5 Point to Point configuration you must be followed configuration guide to avoiding wrong parameter settings. You can get up to 90% wireless speed using proper configuration and parameters. Wireless connectivity based on environment and interference of the area can negatively affect speed.
Related Post
- Cisco DPC3825 Wireless Cable modem Login
- Block Internet Access but keep Local Network access in MikroTik
- 192.168.2.1 Login Digisol DG-HR3400 Broadband Router?
- Comcast XFINITY Approved Modems and Routers