The TPLink multi wan load balance router reduces downtime of your internet using failover feature. Step by step TP-Link Load Balance Router Setup and configuration for two internet line.
TP-Link Load Balance Router Setup and Dual WAN Configuration
TP-Link Load Balancer router basically design to reduce downtime of the internet line. Load Balance Router supports multi wan port to connect more than 1 internet line with the same network to use the auto-failover function. Today every small and larger business based on the internet and failing internet connection can be the loss of business. TP-Link Dual Wan load balance router is the best solution to keep your internet always on using failover function and also balance the speed of the internet. Apart from failover function also read the way to increase wifi signal in your home and office up to 100%.
TP-Link Failover router having multi-port with support WAN function as per the number of internet line comes. The Router support 1 Fix Lan and 4+ RJ45 port either use LAN or WAN as per requirements. TP-Link currently having three different model number of Load balance router with different configurations.
These are the three different Model number of TP-Link Load balance router
TL-ER6120, TL-ER5120, TL-R480T+,
Although web interface and configuration are the same for all the load balance router models so this Post will help you to configure and setup your TP-Link TL-ER6120, TP-Link TL-ERR5120, and TP-Link TL-R480T+ load balance router.
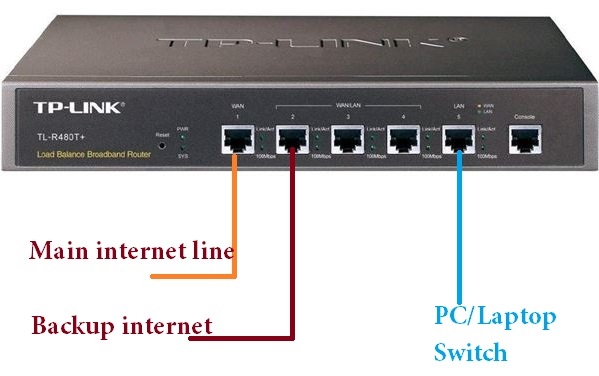
TP-Link Load Balance Router Connection Diagram
To configuration of TP-Link TL-R480T+ or any other load balance model required a physical connection to Pc/Laptop. So unbox TP-Link Load balance router and follow the step to connect physically.
If you have two or more than two internet lines to use failover in the network than connect the all internet cable as shown below image.
Connect load balance router LAN port to PC/Laptop to access the web page to make configurations.
Once your Load balance router connected now follow the steps.
TP-Link Load Balance router Default Settings
To access load balancer required default login settings for the first time.
TP-Link Load Balancer Router default IP Address- 192.168.o.1
Username – admin and password – admin
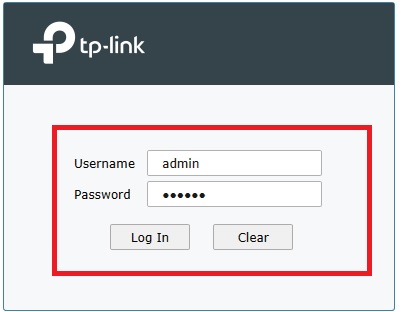
Load Balance Dual WAN Router Login
Now open the web browser and type http//192.168.o.1 and hit the enter key
User admin/admin in username and password and the press Login button.
In the next steps, you will ask to change the default password.
Set a new password to protect your TP-link load balancer router.
TP-Link Load Balance Router Dual WAN Configuration
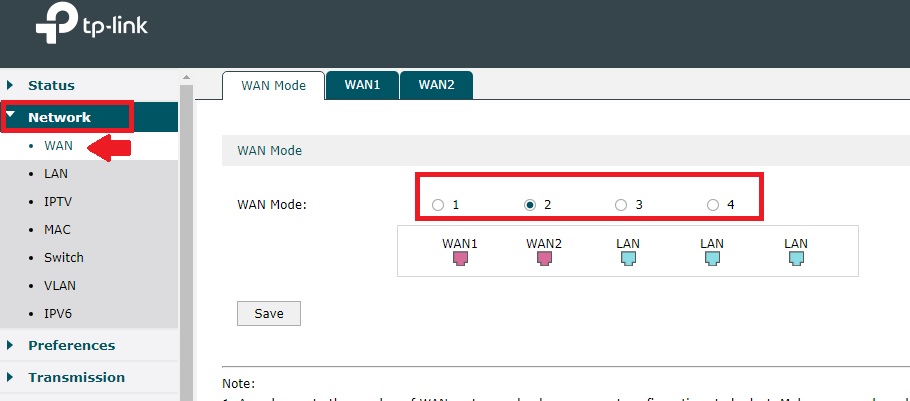
To enable the failover feature in load balancer router should require more than one WAN port. So in TP-link, you can configure more than two internet lime simultaneously to make your network always up.
Set more than one WAN port in TPlink load balancer.
By default TP-link having 1 WAN enabled but you can turn 4 port into WAN ports.
So if you have more than one internet line then follow the steps to turn LAN into a WAN port.
Go to Network –WAN
WAN Mode– Select the WAN port you require as per the total number of internet lines. In TP-Link TL-R480T+ you can use up to 4 WAN and 1 LAN port.
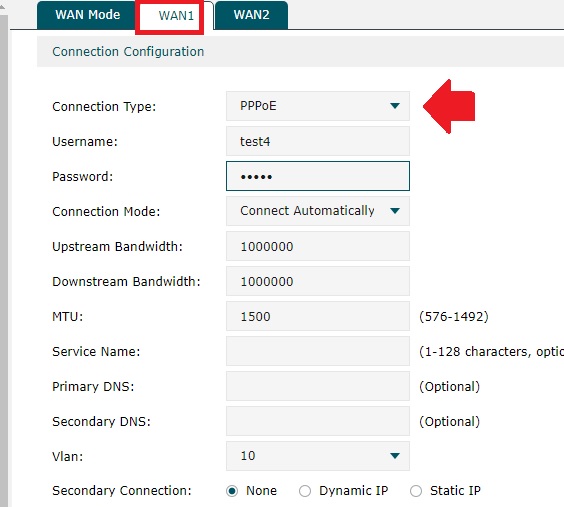
Once you choose WAN port now click on WAN1 and WAN2 port one by one to configure internet settings.
Choose the WAN number from the tab and set the connection type.
Connection Type– choose static, PPPoE, DHCP as per your internet provider internet type.
fill the settings provided by your ISP and save settings.
You can set Upstream and Download stream for WAN type as per internet speed.
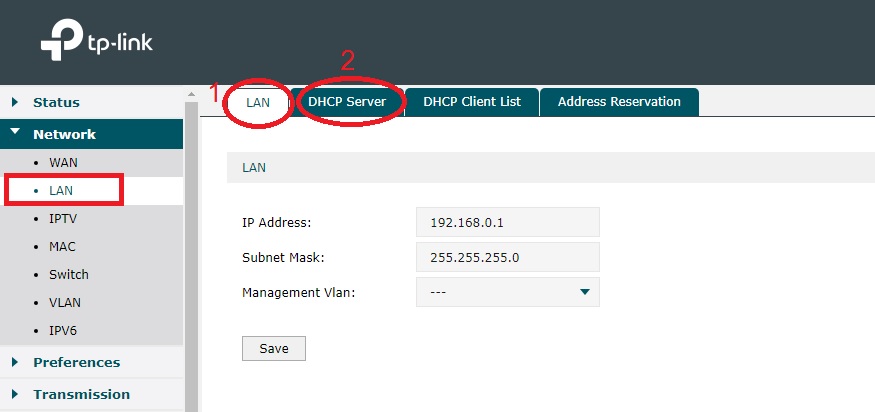
LAN and DHCP server Configuration on TP-Link Load Balance Router
You can change TPLink default IP to any other IP Address in LAN to prevent unauthorized access of your router. To change LAN and DHCP server settings go to the Network option again.
Network- LAN
1: LAN Settings
IP Address: change IP Address here and after save re-open load balance router with new IP Address.
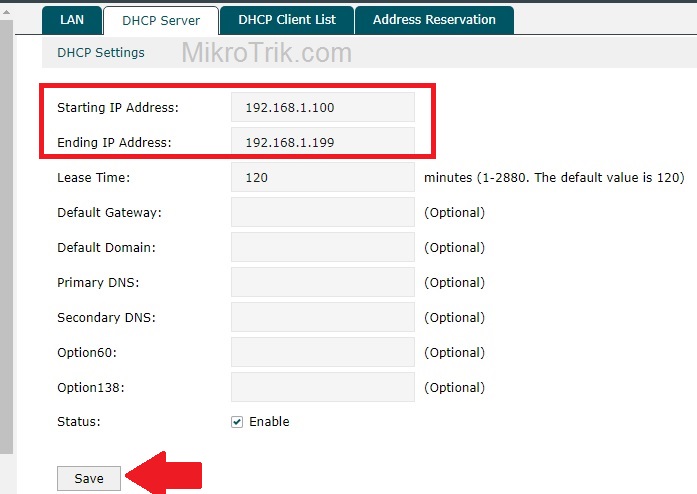
2: DHCP Server settings
Starting IP Address- Type the start IP address you want to provide in the network host.
End IP Address– Type the last IP Address you want to provide in the network.
Save settings once all settings are done.
How to Enable Load Balance in TP-Link Load Balance Router
You can enable load balance once at least two WAN internet connections configured.
TO enable load balancing feature now follow the steps.
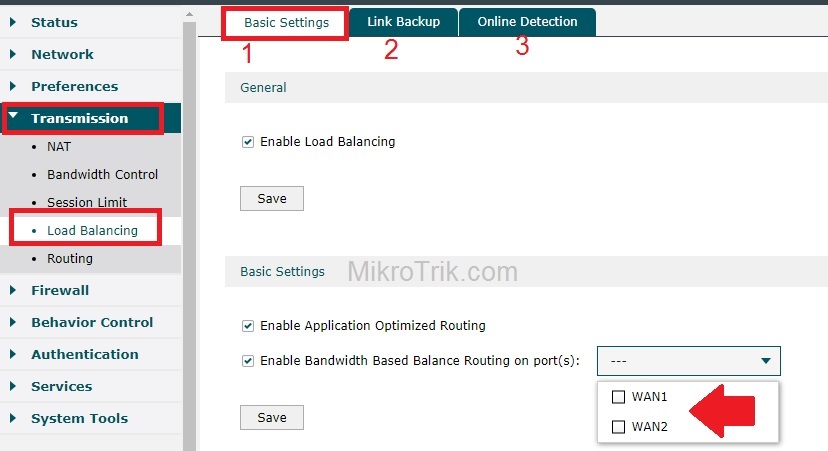
Go to Transmission- Load Balancing
1: Basic Settings
In basic settings enable load balancing options in general options. Click the save button.
Basic Setting
Enable Application Optimized Routing
Enable Bandwidth-Based Balance Routing on port- choose the WAN1 you want to add in bandwidth based routing.
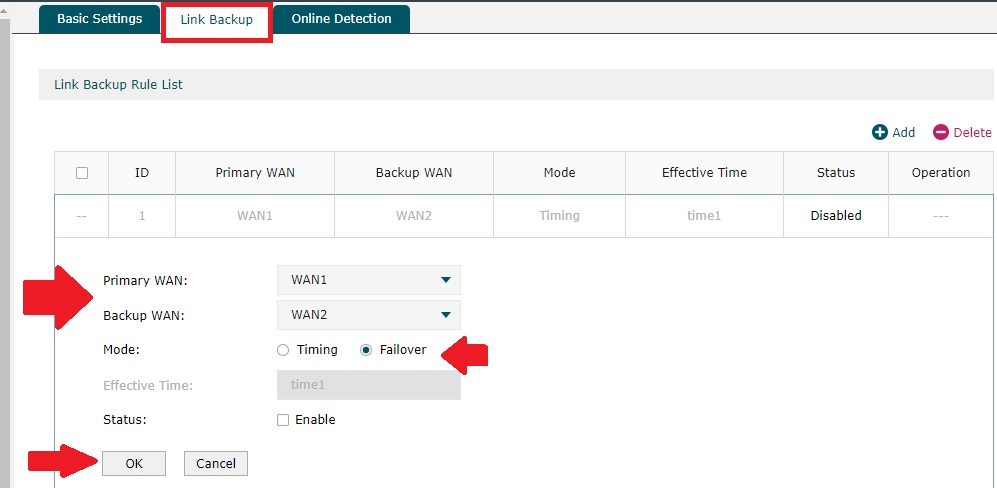
2: Link Backup
The link backup option will assign the Primary WAN and Backup WAN to enable to set failover.
Primary WAN– select the internet line you want to main internet line.
Backup WAN– Select the second internet line, when the main internet line will get down backup will up.
Mode: Select the mode as per timing or failover.
Click OK to save settings.
3: Online Detection
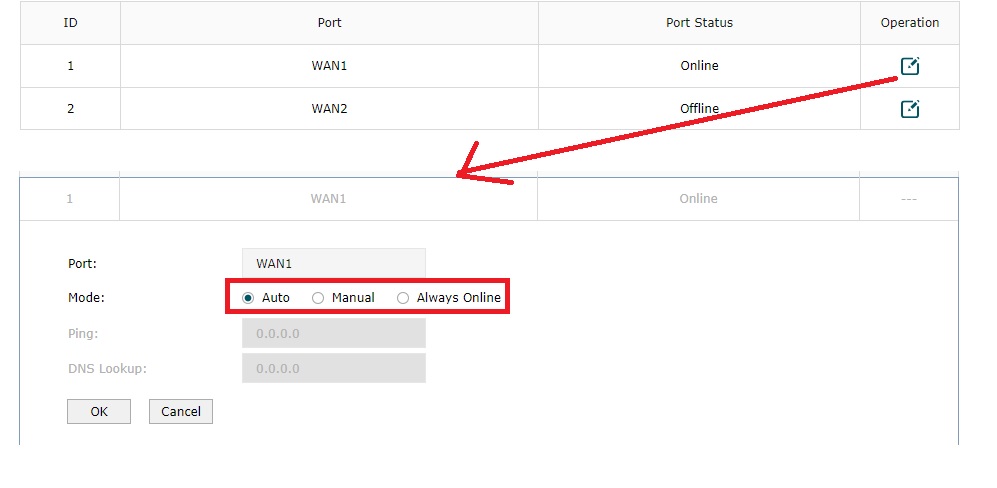
Set the WAN mode to Auto, Manual or Always online as per your requirement.
Recommended Auto mode.
Click OK button to save settings.
Related Post
- 8 Best Open Source Alternate Firmware for Routers
- How to block Website and User in D-Link WiFi Router
- How to configure Airtel 4G Hotspot Wi-Fi router [Airtel E5573C]
- How to Enable and Disable Facebook Profile Picture Login