How to Create IPSec Site-to-Site VPN in Mikrotik router?
MikroTik IPsec Site-to-site VPN is useful to create two different locations’ local networks using a VPN tunnel and share your local files printer and other network resources that are installed at one site and utilized in others. IPsec is a secure way to connect two sites peer to peer using a VPN tunnel that is simply configured in Mikrotik routerOS and works perfectly to connect two sites.
IPSec (Internet Protocol Security) to make two different locations shareable using a secure tunnel. You need two Mikrotik routers at each location to configure an IPsec VPN tunnel to connect both site’s local networks to share all local resources.
Before proceeding to VPN configuration you have to understand the network diagram for VPN connection to make it more easy and understandable.
MikroTik VPN Configuration Network Connection Diagram
In the below Network connection diagram, there are two Site A and Site B.
Site a Connected to the Internet using WAN port IP address (118.179.202.217) and LAN IP address 192.168.20.1.
Site B WAN IP address is 118.179.177.181 and the LAN IP address is 10.10.10.1.
Make all Ethernet 2 to Eth 4 ports to bridge so configuration is applied for all ports.

Once your both site router ready with an active internet connection now follow the steps by step configuration of enabling the VPN tunnel in the Mikrotik RB750 or Mikrotik CCR series router.
Site A- VPN Configuration on MikroTik Router
Configure the IPSec VPN tunnel first in the location A router and then follow the same steps to configure for the Location B router.
Step-1 Create Profile
Go to IP-IPsec option to create a New profile.
Press Plus Button (+) to add a new profile.
Encryption Algorithm: check 3des , aes-256 and modp 1024 only and press apply OK button

After profile creation now follow the next configurations.
Step 2- Create Proposals
Go to IPsec- Proposal tab as shown below image.
Press + (plus) button and check “sha1” and aes-256 cbc”
Lifetime- set lifetime in hours and press apply OK button to save

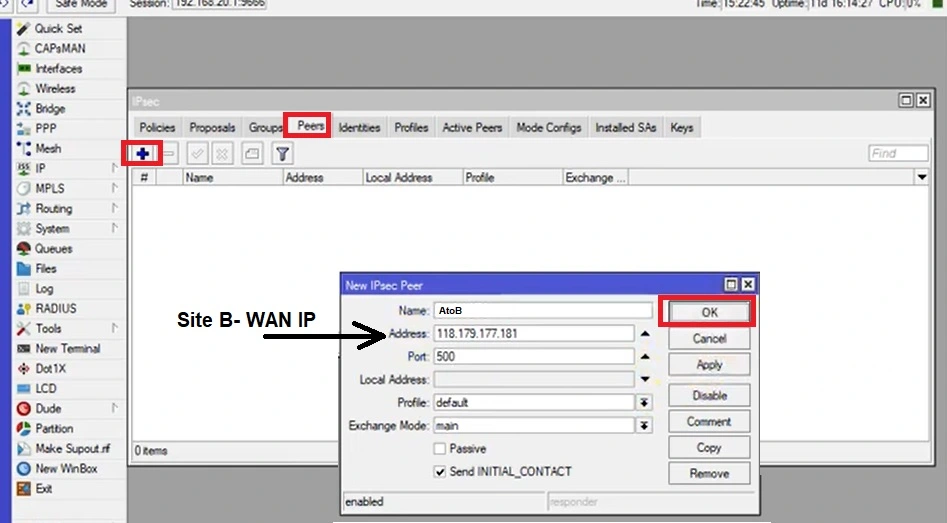
Step3- Create Peers
Go to IPsec- Peer Tab.
Press the Plus button.
Name- AtoB (give site name or as per your choice)
Address- 118.179.177.181 (give Site B WAN IP address)
Port -500 (or use any port but use the same for both sides of the router)
Press Apply and OK buttons to save settings.
After finishing peer configuration now follow the next steps.
Step 4- Create Identities- under identities, you have to create a security key to make VPN secure.
Security will be the same for both side routers to allow the connection.
Identities- Press Plus button.
Secret– create a strong password here to protect the VPN tunnel

Press Apply and OK buttons and follow the next steps.
Step 5- Create Policies
Go to IPsec-Policies and Press plus button to create new policies.
Peer- AtoB (select your site name from the list)
Tunnel- checked
Src. Address- 192.168.20.1 (LAN IP address of Site A )
Dst Address- 10.10.10.1 (LAN IP address of Site B)

Press the Apply and OK buttons and follow the next steps.
Steps -6 Create a New NAT rule in the firewall to allow traffic from the Site B location.
Go to IP-Firewall
NAT tab
Press + (Plus) button to create new Rules.
Src . address- Site a LAN IP (192.168.20.1/24)
Dist Address- Side B LAN IP (10.10.10.1/24)
Action – Accept
Press the OK button to save settings.
Site A VPN configuration completed now follows the same steps to configure site b locations.
Site B VPN configurations
Step-1 Create Profile
Go to the IP-IPsec option to create a New profile.
Press Plus Button (+) to add a new profile.
Encryption Algorithm: check 3des , aes-256 and modp 1024 only and press apply OK button
Step 2- Create Proposals
Go to IPsec- Proposal tab as shown below image.
Press + (plus) button and check “sha1” and aes-256 cbc”
Lifetime- set lifetime in hours and press apply OK button to save
Step3- Create Peers for Site B
Go to IPsec- Peer Tab.
Press Plus button.
Name- BtoA (give site name or as per your choice)
Address- 118.179.202.217 (give Site A WAN IP address)
Port -500 (or use any port but use the same for both sides of the router)

Press Apply and OK buttons to save settings.
Steps 4- Create Identities- Use the same security for Site B as used for Site A location
Identities- Press Plus button.
Secret- use the same security Key used for Site A location.

Step 5- Create Policies for Location B
Go to IPsec-Policies and Press plus button to create new policies.
Peer- BtoA (select your site name from list)
Tunnel- checked
Src. Address- 10.10.10.1 (LAN IP address of Site B )
Dst Address- 192.168.20.1 (LAN IP address of Site A)

Steps -6 Create a New NAT rule in the firewall to allow traffic from the Site A location.
Go to IP-Firewall
NAT tab
Press + (Plus) button to create new Rules.
Src . address- Site B LAN IP (10.10.10.1/24)
Dist Address- Side A LAN IP (192.168.20.1/24)
Action – Accept
Press the OK button to save settings.
VPN Connection Established
just confirm if your IPSec Site-to-Site VPN configuration is completed properly. Once both site router VPN configurations are done you can see a connection Established between both routers using a VPN tunnel.
Go to IPsec- Policies tab and see you will PH2 state- Established as shown below connection.

If your configuration is done but not showing established on Ph2 state then make sure both site internet is active and router properly configured and the peer secret you use for both sides should same
Just check if you using both sides same security key to allow connection from Site B to Site B.
You can also update the Mikrotik firmware version with the latest release and follow the configuration again to create your IPSec Site-to-Site VPN Tunnel between both Locations.
Related Post
- How to Setup MikroTik WiFi Router as Repeater mode
- Mikrotik groove Login and AP Mode configuration
- LIST OF BEST CHEAP ROUTERS TO BUY
- MikroTik SXT Sq Lite5 Factory Reset [3Way]