How to setup VPN in Mikrotik Router for Remote Access
Mikrotik is one of the most used router and wireless products in internet service providers and networking companies because of its award-winning RouterOS. If you are using the MikroTik router in multiple locations and do not have a public IP address to access remotely and manage from a centralized location. This is a simple configuration for How to setup a VPN server in a MikroTik router. Mikrotik Router supports multiple types of VPN services like PPTP VPN which use a PPTP port, L2TP VPN, site-to-site VPN and MikroTik IPsec VPN.
All the VPN types can be used for creating a virtual network tunnel between more than one private network. The best thing about Microtik RouterOS is it gives you a secure network as well as stable networks.
However, VPN (a virtual private network) will help you to access the Mikrotik CCR router remotely without public IP addresses using a VPN client. You can configure VPN in any MikroTik Routerboard to access remotely from a different location.
Login MikroTik Router to setup VPN
To configure VPN in the Mikrotik router board need to access the router via a Winbox or web login.
Connect Mikrotik router using LAN port and open in Winbox configuration utility.
Use MikroTik default username admin and MikroTik default password not required and leave the password option blank. If you are using configured MikroTik device use the password you have configured before to log in.
Enable VPN in MikroTik Router board
To configure the VPN on Mikrotik device enable VPN first and setup the VPN password.
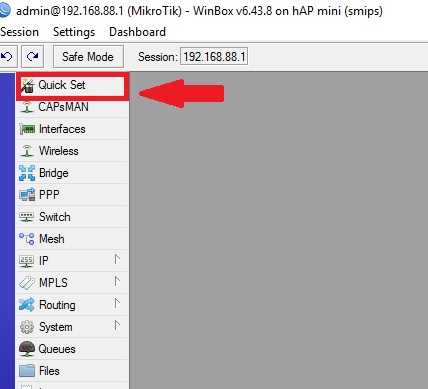
Go to the Quick Set option as shown below image.
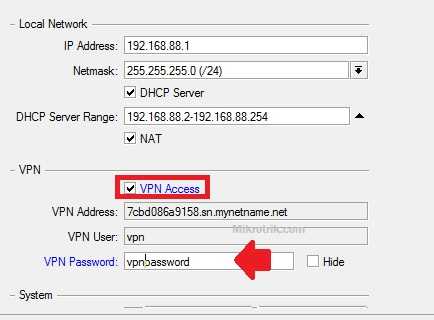
Find the VPN settings just Below the Local Network option.
Check VPN Access Option to enable it.
VPN User: VPN (default username)
VPN Address: It will show automatically.
VPN Password: create a VPN password.
After VPN access settings now create profile settings and add DNS and gateway.
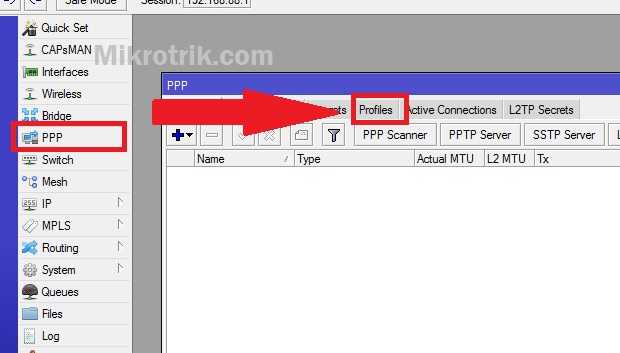
Go to the PPP option and click on the Profile tab as shown below image.
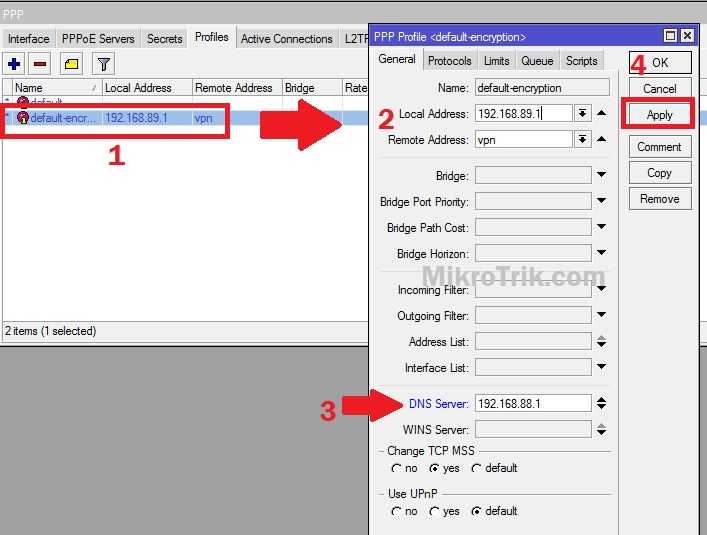
1: Now double-click one default encryption.
2: Local Address: 192.168.89.1 (this address will auto-configure while VPN enable)
Remote Address: this will auto-configure.
3: DNS Server: give MikroTik LAN IP to DNS.
4: Click Apply and OK buttons to finish settings.
MikroTik VPN setup for remote access of router finish now test the VPN configuration.
Create a VPN client connection in Windows 10
If you are using Windows 10 or Windows 8.1 you can directly create a VPN connection using a VPN client option.
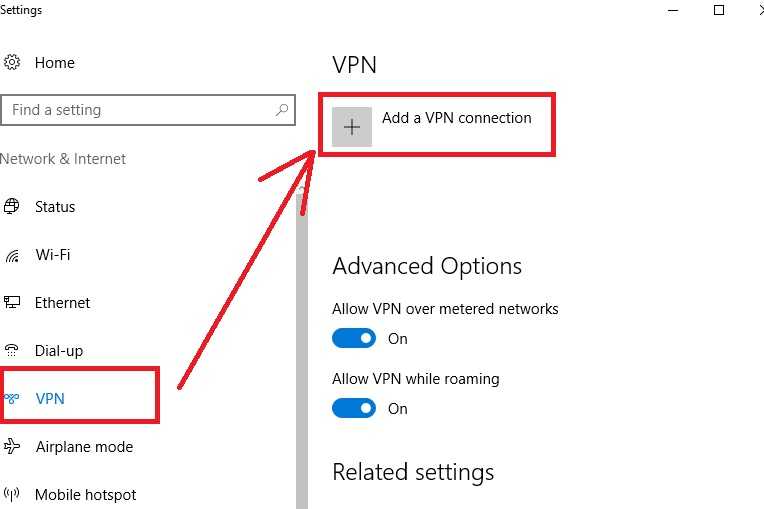
Just open the start menu and search for VPN.
Click on VPN
“Add a VPN Connection”
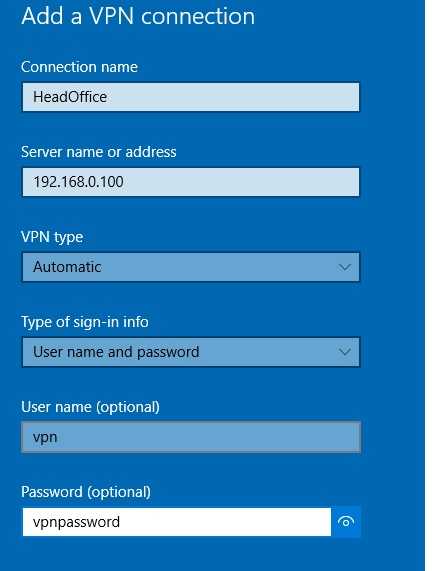
Create a New VPN connection
VPN provider: Windows (built-in)
Connection Name: give the name of the VPN connection
Server Name or address: give the WAN IP address of the Mikrotik router you have set up a VPN.
VPN type: Automatic
Type of Sing-in info: username and password
Username: VPN
Password: (use the password set on the VPN password)
Click the Save button.
Connect VPN connection from Windows 10
Click on VPN connection and press the Connect button to dial VPN.
Wait for a VPN connection connecting to the Mikrotik Router VPN tunnel.
Successful authentication will show the connected status on the VPN connection name.
See the below image for reference.
Now you can access your MikroTik CCR RB3011 or any MikroTik cloud core router as well as other device using VPN server configuration.
If you are using older Windows you can configure OpenVPN in MikroTik or also can use OpenVPN client software to access the Mikrotik VPN network from different networks.
Related Post
- Mikrotik groove Login and AP Mode configuration
- TP-Link AC1750 Range Extender Mode Setup [Archer C8]
- How to Access Phone screen to PC (Mirror Phone)
- TP-link L2 Managed Switch Bandwidth limit configuration
- Login Time Warner Router to change WiFi password

