Manage your small or larger size network and utilize full internet plan using TP-link L2 Managed Switch Bandwidth limit for each port and user-based.
TP-link L2 Managed Switch Bandwidth limit configuration
The smart way to manage a larger and medium-size network is using a managed switch. To run a problem-free network depends on the management of network equipment. an unmanaged network is difficult to solve quickly any networking glitch. Using smart management switch help the network to prevent from any network issue and easy to identify problems. TP-link TL-SG2424 smart-managed switch is a 24 Port Layer 2 managed network switch. It is a fiber combo port uplink switch equipped and comes with many useful layer 2 management features which makes your network smooth and problem-free. also know how to secure home and office wifi networks.
If you are using TP-link smart-managed switch in your network then you can manage internet speed on each port based on priority user and utilize small internet plan like a bigger plan. TP-link SG2424 Internet speed limit settings on each port simple and affective with customizable data speed limit for download and upload. You need a physical connection from TP-link l2 web smart-managed switch to setup bandwidth control settings and any other management configuration. TL-SG2424 l2 switch support loop detection, spam protection, port isolation, and many other enterprises feature to protect the larger sized network.
TP-Link TL-SG2424 L2 Managed Switch Connection
Power switch and connect cat6 LAN cable to any LAN port from (1-24) to your PC/Laptop LAN port.
TP-Link TL-SG2424 Default LAN IP is- 192.168.0.1
Username- admin
Password- admin
Configure PC/Laptop LAN IP Address to 192.168.0.10 in static mode.
Login TP-Link Smart Managed Switch First Time
Open Web browsers such as Google Chrome, Firefox, and Mozilla.
Type 192.168.0.1 in the URL bar and hit enter key.
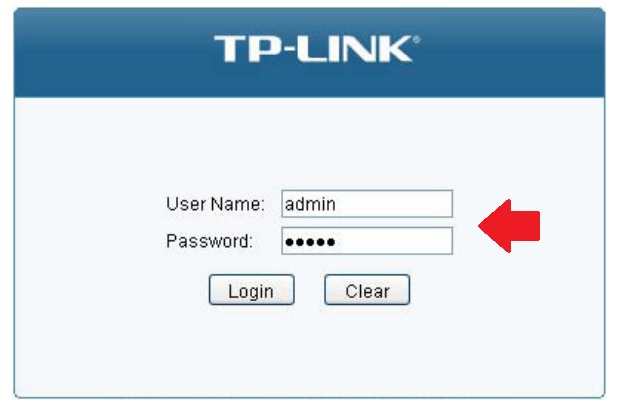
The login page will open as shown below image.
Use the default username and password “admin” and click the login button.
Setup Download and the Upload speed limit in Port
After login now setup TP-Link web smart switch bandwidth speed limit in port as per your internet plan.
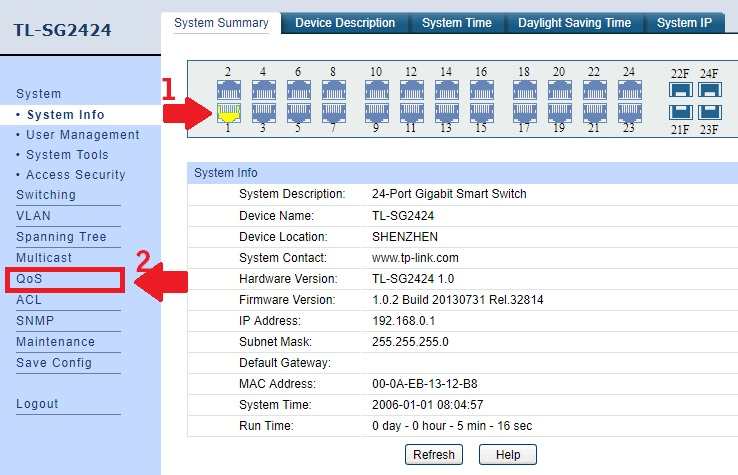
1: Port Number showing connected status or UP status inside switch System info page. You see all information of switch related to Mac, IP address, Firmware version uptime and model number inside system info page.
2: QoS (Quality of service): to set internet speed in port go to QoS settings.
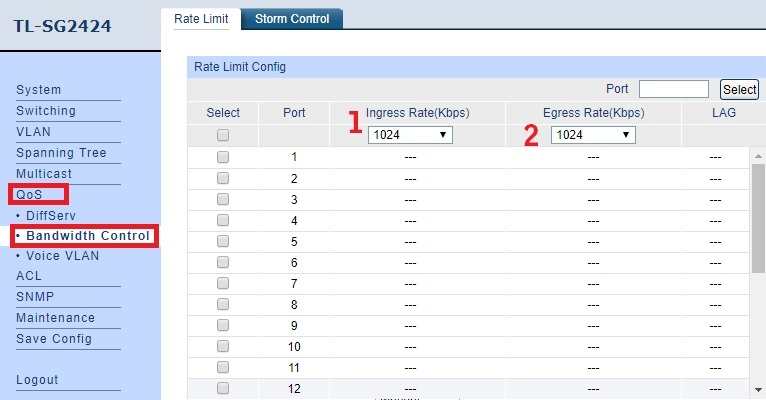
Go to QoS- Bandwidth Control
1: Ingress Rate (Kbps) – Ingress speed means Download speed.
2: Egress Rate (kbps)– Egress means upload speed of the port.
Now Set Bandwidth Limit in each port
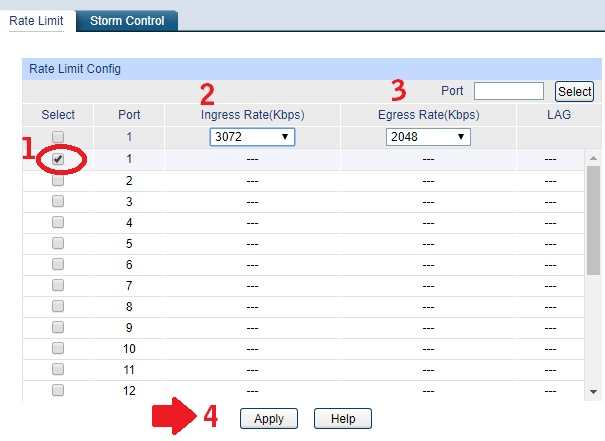
Rate limit config: Now select the port you want to limit download and upload speed limit.
1: Port- Select the port number you want to set speed limit (you can select multiple ports in the same time if want to give same speed to multiple users)
2: Ingress Rate (Kbps): Select the speed limit for download from the drop-down list or you can use other option if you want to give a customize speed rate limit.
3: Egress Rate (Kbps): Select the speed limit for upload from the drop-down list or you can use other option if you want to give a customize upload speed rate limit.
4: Click the Apply button to apply the speed limit in ports.
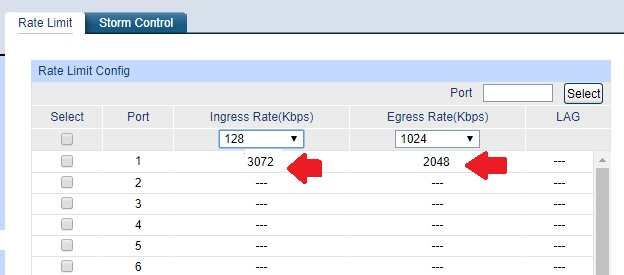
You can check speed applied in download and upload speed limit as shown below image.
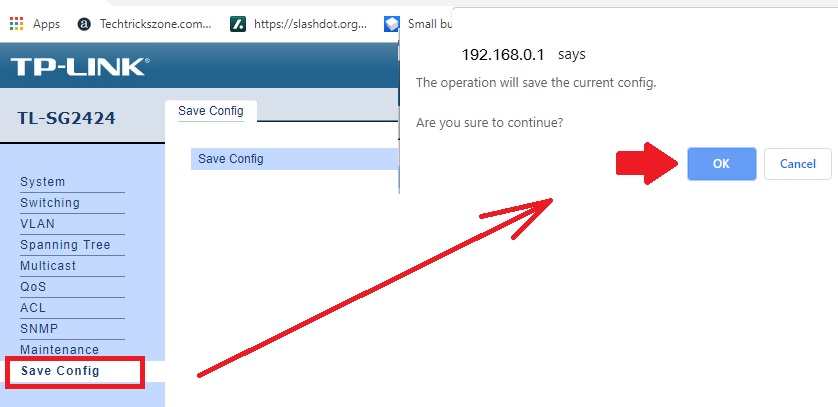
If you have set the bandwidth speed limit in each port now need to save configuration permanently.
Go to Save config option and click OK button to allow device reboot and apply all the settings.
The switch will take a few minutes to reboot and write all settings. You can now test the speed limit in each port as per provided by your internet plan.
You can also enable other feature like, loop detection, port isolation, and many others to protect any issue from host devices.
Related Post
- How to Create a Hotspot in Windows 10 without Software
- How to block Website and User in D-Link WiFi Router
- Mercusys MW305R WiFi Router Setup and Configuration First time
- TP-Link TL-SG2424 Smart Switch User Manual
