Tenda N301 v2 WiFi Router Setup and configuration manual to get a stable wifi network and maximum internet speed.
Tenda N301 v2 WiFi Router Setup and Configuration First time
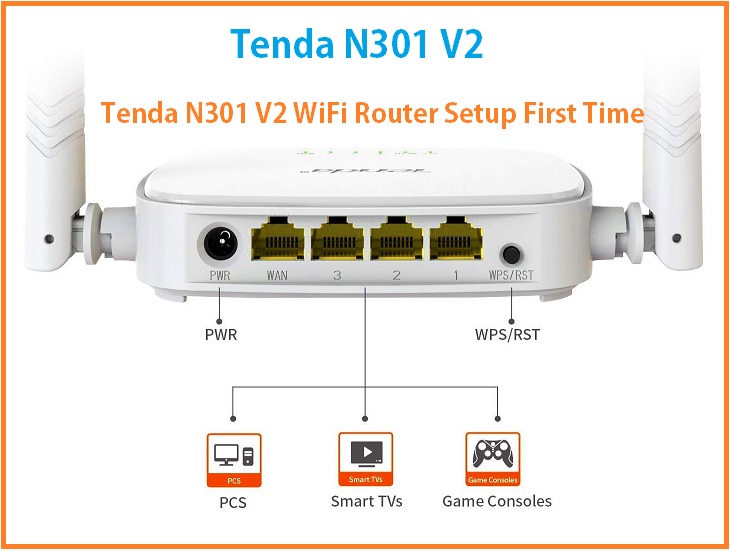
Tenda N301 11n wireless router with 300 Mbps wifi speed. N301 having Version 1 and version 2. It is the best WiFi route for home internet plans up to 50-60 Mbps. Tenda N301 having two 5 dBi omnidirectional for WiFi devices. 1Wan and 3 LAN port available for physical wired connection of desktop and other network devices such as network printer and NVR.
In this post, you will get a detailed configuration manual for Tenda N301 v2 WiFi Router Setup first time with PPPoE and Static mode. To configure Tenda N301 300Mbps wireless router you required a physical connection and a Laptop or desktop to access the web interface. Apart from wireless and WAN configuration, you can enable parental control to protect your child from cybercrime and surfing unusual websites. The bandwidth control feature lets you enable the limit of wifi users based on requirements and propriety.
Tenda N301 V2 WiFi Router Physical Connection
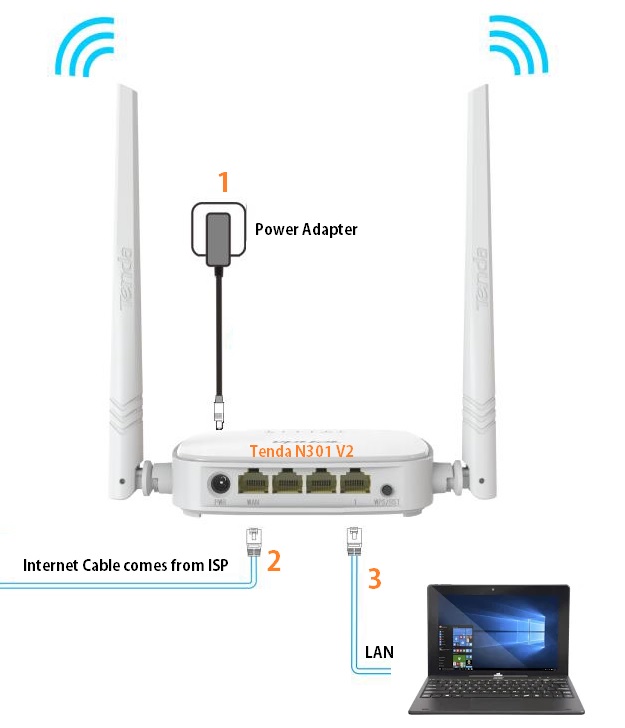
Unbox the Tenda N301 WiFi router box and follow the steps to the physical connection.
1: DC Socket: Connect Power Adapter comes with your WiFi router and power On as shown below image.
2: WAN port: connect Internet cable coming from the Internet service provider or Modem.
3: LAN port (1-3): Connect LAN port from router to Laptop/PC LAN port.
PC LAN IP Configuration: To access the Tenda Wi-Fi router web interface PC LAN IP address should be in the same series of Tenda default IP address.
Tenda N301 Default IP Address: 192.168.o.1
for Tenda ADSL modem http://192.168.1.1
Use the 192.168.0.10 0r DHCP mode in your PC/Laptop LAN IP address.
Tenda N301 Wireless Router Login First time
Now open internet browsers such as Google Chrome, Firefox Mozilla, or internet explorer and type http://192.168.0.l and hit the enter key.
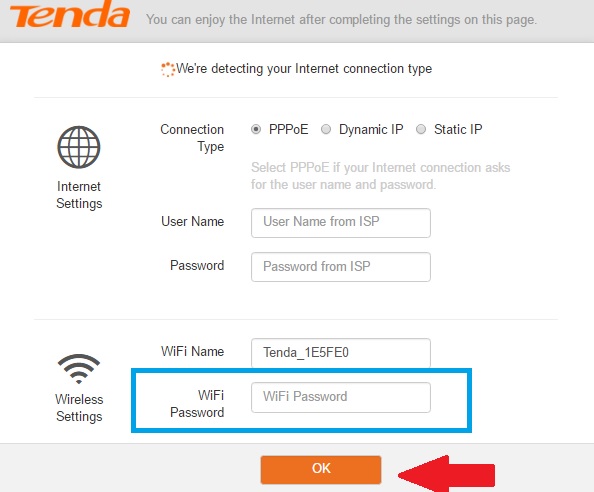
Create a WiFi password and click OK to login Tenda wifi router.
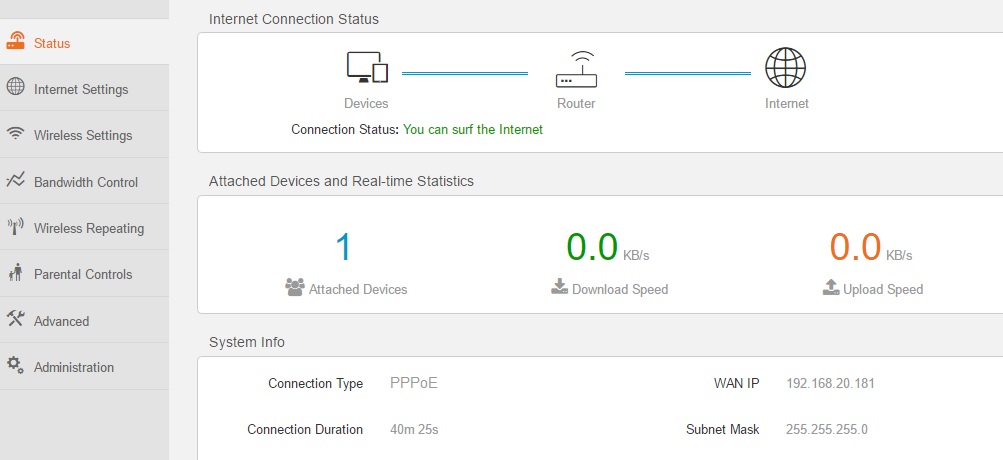
Tenda Wireless Router Status page
You will land on the status page during the login process. In the status page, you can check the physical wired connectivity map and the total number of WiFi users connected to the wifi router with Download and Upload speed.
WAN Configuration with Static IP Mode in Tenda WIFI Router
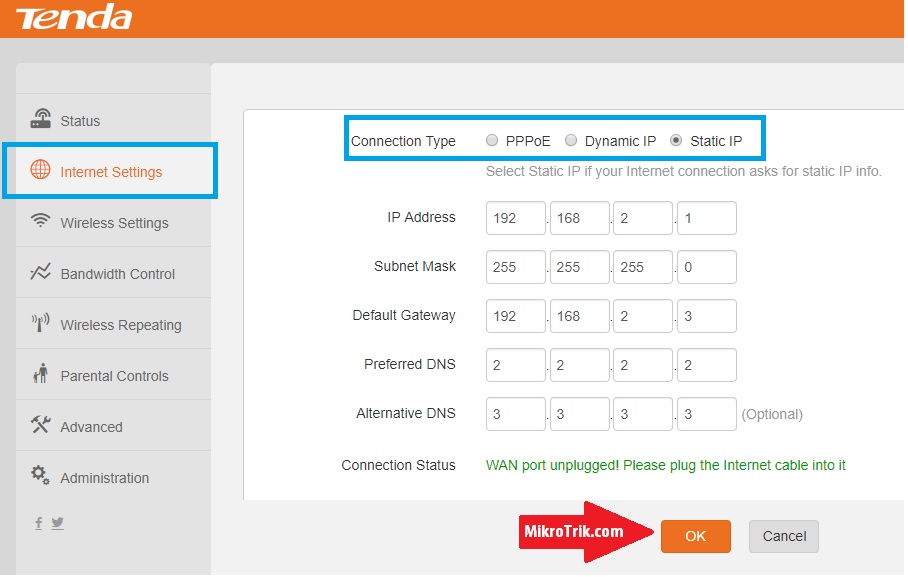
Go to Internet settings from the left side menu.
Connection Type: Static IP ( choose your Internet type, PPPoE, Dynamic, PPPoE).
IP Address: use IP address Gateway and DNS details got from your internet service provider.
PPPoE username and password: Contact your service providers for the PPPoE dial-up username and password.
After settings press OK button.
Tenda N301 v2 Wireless SSID and Password Configuration
Go to Wireless Settings.
WiFi ON/OFF: button should be ON.
WiFi Name and Password:
WiFi Name: type your WiFi name here for your Tenda WiFi.
Security Mode: WPA2-PSK (recommended).
WiFi Password: type the Password for your Wi-Fi network.
WiFi Signal Strength:
Use High to get full signal strength in every place.
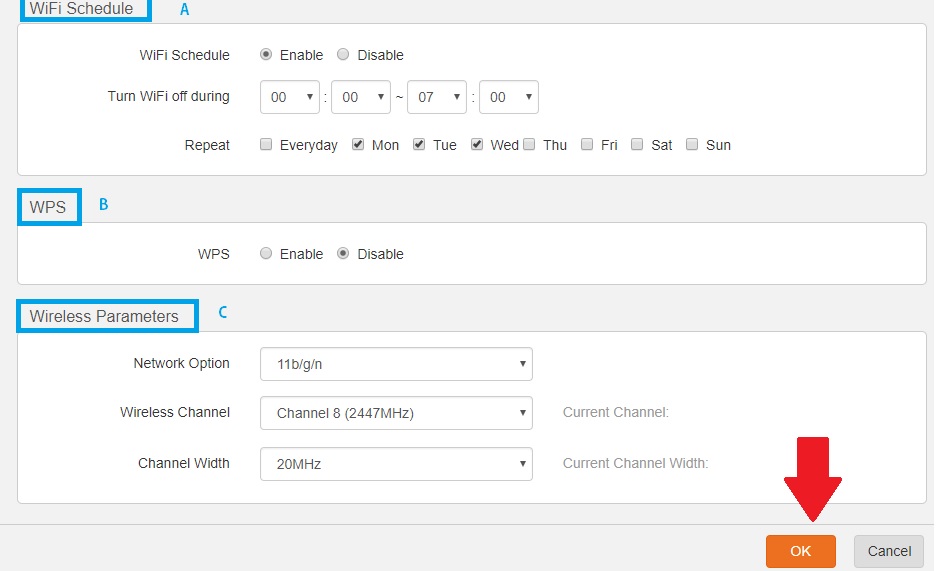
Tenda N301 WiFI Schedule: You can set a WiFi working schedule time and day to control your child’s internet surfing during study time.
Enable WiFi Schedule in Tenda Now
WiFi Schedule: Enable
Turn WiFi off During set the time when you want to enable your wireless internet.
Repeat: Select the weekdays when you want to apply internet schedule time.
WPS: WPS is Wi-Fi Protected Setup. It is used to connect your mobile using the WPS button without using the Wi-Fi password. Keep it disabled if you do not want to allow anyone to connect using the button.
Wireless Parameters:
Network Option: use b/g/n
Wireless Channel: use Auto if using signal Wi-Fi in location. Use 1,6,11 if more than 1 WiFi device using.
Channel Width: use 20 MHz if the internet plan is up to 20Mbps and 40 if more than 20Mbps.
Press the OK button to save settings.
LAN and DHCP server Configuration in TENDA N301
Every Wireless router comes with the default IP address. Always recommended to change the default IP address to protect the wifi network from unauthorized access.
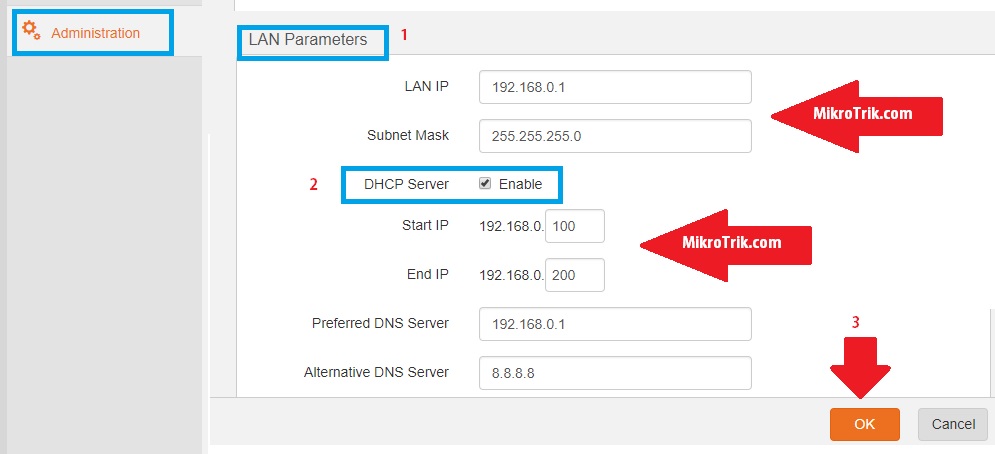
Go to Administration
LAN parameters:
1: LAN IP: 192.168.0.1 (change the IP address in this box and reopen the device with the new IP).
2: DHCP Server: Enable
Start IP: set the IP address you want to start in your networks.
End IP: set end IP.
Preferred DNS: type the custom DNS server provided by ISP.
Press the OK button to apply settings.
Tenda N301 v2 Remote Access Web Login Enable
The remote setting is a part of security to disallow access to your wifi router from the remote side. If you want to enable WAN web access of your Tenda WiFi router then enable remote access settings.
Go to Administration.
Remote Management: Enable (checkbox to enable remote access).
Allow internet users: if you want to allow all the users can access your router using a WAN port then use Any.
For specific IP Addresses to allow your Tenda router remotely choose Custom and set the IP address and port number to enable remote access.
Tenda N301 v2 Default Password Change
To protect your Tenda router login keep the change and update the login password.
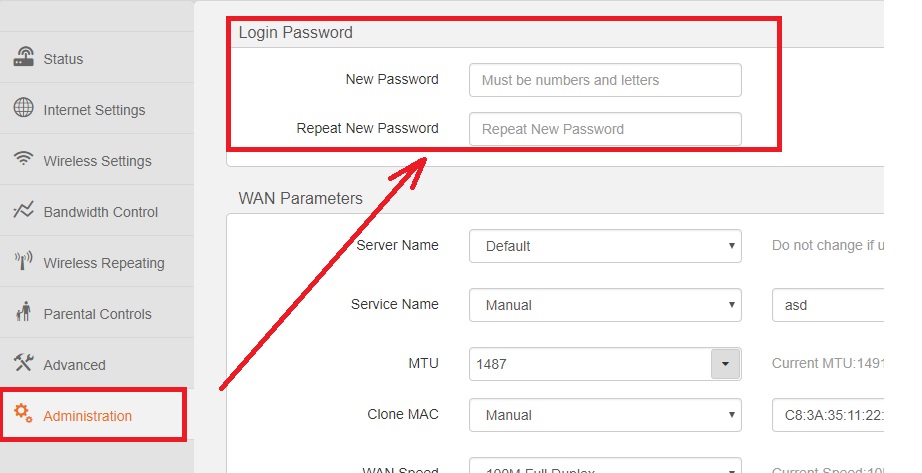
Administration:
Login Password: New Password: type new password here
Repeat New Password: type password again to confirm
This is the brief configuration manual for the Tenda N301 v2 Wireless router to avoid any performance and legging issues. Miss configuration is the major reason for speed and wifi network instability problems when more than one user is connected to the wifi router. Always follow the proper configuration manually to get maximum output and speed in the wireless router. We have tried to get a proper and simple configuration manual for the Tenda N301 v2 WiFi router setup the first time. To keep a problem-free wifi network always update the Tenda latest firmware from the official website.
Related Post
- How to configure Airtel 4G Hotspot Wi-Fi router [Airtel E5573C]
- UBNT Airfiber AF5U Point to Point configuration for Long Distance
- OpenWrt Repeater Mode Configuration with Non-OpenWrt AP
- Best Android App Player for Windows and Mac PC
